Here is some simple Organic gardening tips. You’ll most likely be a little stunned to see how many tools you may need. It’s ironic since natural No-Dig gardening itself is supposed to be natural and No-Dig.
Rest assured that several devices will be helpful if not essential. As well as other equipment that you’ll need to acquire at the beginning.
It is a sensible idea to write down all you require as well as take a look online to see what the costs are. As planning will provide you with a suggestion of what your spending plan ought to resemble before getting going with your organic gardening.
The good news is that a lot of the products you buy will undoubtedly last for many years. With organic garden tips, if you’ve expanded your list of homegrown veggies efficiently, you will conserve a lot on grocery store bills and redeem your costs, considering that you’ll have your own produce to consume.
If you have bumper harvests or compost, you might also offer the excess fruit and vegetables and compost to others in your community. Organic foods at the supermarket tend to be costly. If you’re billing much less for natural veggies.
You can bet that many health-conscious people will certainly buy from you instead (to make sure that they can save a few bucks).
Tools/Equipment
Let’s consider the tools/equipment you’ll need;
* Pruning shears
You’ll require this to prune your plants or remove the heads of weeds to feat their growth.
* Wheelbarrow
Depending upon the size of your garden, as an organic gardening tip you might need to get one of these. Also, a wheelbarrow will be very valuable for moving the garden compost from the stack to your yard if you’re composting.
* Rubber handwear covers
These are necessary when picking off insects or for weeding, managing garden compost, dirt screening, and so on. If you spend a reasonable amount of time in the garden, gloves are an excellent investment.
* Rake.
Useful for piling up dead fallen leaves or smoothing the ground and spreading compost over your beds. If you can afford it have a heavy-duty metal head rake for more robust use. Have a flexible wide rake and a narrow one as they all have their place in a productive garden
* Watering can
Using a watering can is more effective at reducing water use if you have low water reserves than utilizing a garden hose to spray your plants indiscriminately. The water that spouts out of a watering can is much easier on the plant. It will not disrupt the soil and can be poured where it needs to be. Try not to buy the really cheap plastic type I have two galvanized ones
* Trowel set
There are many variations of this type of tool. You will be using it to excavate small holes to grow the seeds, or scrape apart mulch near your plants, and so on. They are handy for many jobs that you do up close with the plant.
* Hoe as well as spade
The hoe is generally utilized to dig the dirt, form beds and perhaps chip weeds in more extensive gardens, and so on. The spade will undoubtedly be made use of for scooping up garden compost from the heap on the wheelbarrow.
Hoes and forks are usually made use of to turn the dirt and aerate it.
Usually, it’s not suggested to till the soil way too much. When you’re first starting, you may need to dig to form your beds; after that, it’s best to utilize composting and mulching to keep the soil.
* Soil testing kit, water moisture meter and thermometer ( not essential but will become helpful)
- Pocket Knife I have a slimline good quality one that has a simple folding mechanism that I am always pulling out of my pocket for some use or another.
* Dibber for transplanting seedlings. You can get as fancy as you like, but an old knife from the kitchen draw has served me well over the years
Extras
The soil testing kit will undoubtedly be extremely valuable for evaluating the acidity of the dirt. While not forgetting soil testing is a task for growing numerous vegetables and plants, don’t get hung up on getting one; just start with good compost and get started.
A water moisture meter will undoubtedly allow you to ascertain if your soil has adequate water or is dry. In the new earth you are building up it is sometimes easy to get fooled by how wet or dry the ground is.
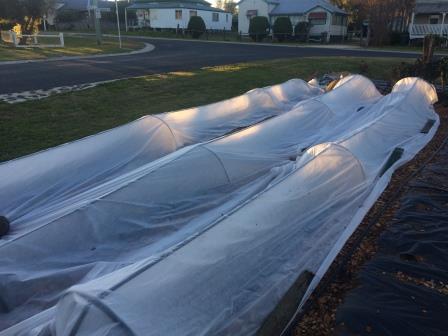
Low Tunnels basically are for insect control and low-level heat or frost control. These can be as basic as sturdy wire formed into a hoop and pushed into the ground with the cloth folded over and held down with a heavy weight such as a brick.
These are several of the convenient things that you’ll need for your garden as well as they’ll make your life a lot easier.
It always pays to remember to look after your equipment after usage and store them in a dry area.
TIP: for small hand tools, find a sturdy bucket and make it your garden depository. If you leave tools on the ground in the garden they will get lost.
Do NOT leave your pruning shears or rake existing around the garden. These can be hazardous if someone unsuspectingly steps on them.
Get the products you need, look after them well. Have the goal to be the very best organic garden enthusiast that you can be, and you’ll have a garden that’s a freedom buddy you can visit anytime.
How to Change to a No-Till garden
Tilling your garden is a great way to separate compacted dirt and obtain some air in the soil. One element of organic garden tips is it shouldn’t be required to extremes unless the ground is rough or very compacted, though most people tend to do that because they believe that the plants will undoubtedly struggle to grow if some parts of the dirt are clumpy.
You want to maintain the stability of microorganisms as well as improve the structure of the dirt. As long as the soil has room for the plant to breathe and expand, the seed will germinate, and the plant will press through in an organic garden at home.
So, tilling does have an objective. However, it’s ideal for tilling your garden only as soon as when you’re first beginning to utilize it if needed.
Tilling the soil frequently will undoubtedly trigger the disintegration of any active soil microorganisms.
No-Dig Gardening
So this raises the inquiry … “Yet just how do I make my yard healthy without tilling it?”.
Of course, the very best means to accomplish this will be to change to a no-till garden. Listed below, you’ll find a list of reminders and organic gardening tips required to achieve this objective.
Action Points
Action 1: You’ll need to find recycled cardboard to lay down first and include a 2-inch layer of garden compost over the yard in areas where you’ll do your planting. There’s no requirement to rake the dirt or mix the compost in it. Leave the soil uninterrupted.
Action 2: I Allow a few weeks for the cardboard to break down and for the area to be ready to end up being fertile enough to start planting.
Step 3: Prepare footpaths and compost areas and your water needs while preparing the planting area.
Step 4: source or grow/prepare seedling transplants.
Step 5: Plant out seedlings or direct plant seeds. The cardboard should be sufficiently decomposed to put a hole in it as you plant into your starter soil/compost.
Action 6: Once harvesting is done, try to leave roots in the ground, you can add one more garden compost on the beds if you have it and provide the garden bed with more soil fertility
Action 7— When planting once more, keep in mind not to forget to record previous plantings in the area.
Action 8— After your use of compost to layer the ground, as mulch as well as its fertility. Depending on the size of your garden, If you can obtain manure, include some in your compost heap. You can then allow it a couple of months to come to be a part of your own manufactured compost/mulch for your soil. Reliable organic garden tips are you may need to alternate between your own garden compost as well as compost from a supplier.
Final Thoughts
I have tried to compress a lot of actions into a primer article. But, unfortunately, the whole procedure is rather long. First, you’ll need to prepare when and where you’ll be growing your plants. You’ll also need to recognize what you want and can grow and crop rotation.
There will undoubtedly be some periods (that might last months) where you’ll not be doing any growing since you have laid garden compost or mulch on your yard as well as they require time to take effect,
as well as taking into consideration your growing seasons for your area.
This is a component of natural horticulture. It takes even more time and effort to garden in an environmentally aware method. However, if you follow the techniques in this short article, your soil will have all the nutrients it requires without you needing to till and disturb the dirt, all the earthworms and mycorrhiza can be undisturbed.
Give no-till gardening a shot. The slow and stable way is the very best method to tackle it.
I do have opportunities for anyone interested to undertake a no-dig garden challenge online where I can answer questions; you receive an ebook, and you can take part in a 5 part challenge to help you get started.
My emphasis is always around the primary permaculture principle of obtaining a result. You can then observe and improve your efficiency and output.